Friday, Week 3
Plan: Seconds colour duller and matching clock body. Hours and minutes bright white.. Hours 2 leds, mins 1?
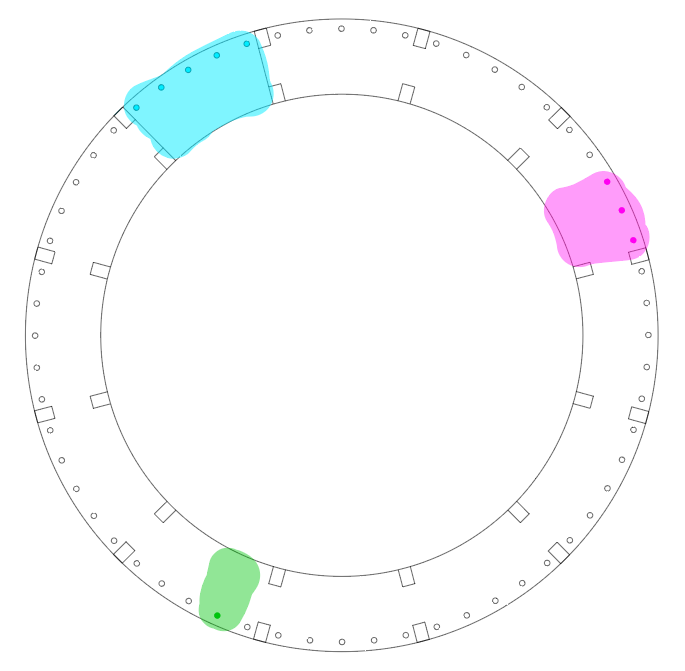
I played around a bit with the code after class and wit some help from Wendy, managed to change the colour and brightness of the LEDs. As well as this I made the hour representative LEDs 5 instead of the original code’s 3, and the minutes into 3 LEDs.
Below is my edited code.
LIZZIE_LOVES_CODE_mick:
#include <Wire.h>
#include <RTClib.h>
#include <Adafruit_NeoPixel.h>


#define PIN 8
#define PIXEL 60


Adafruit_NeoPixel strip = Adafruit_NeoPixel(60, PIN, NEO_GRB + NEO_KHZ800); // wrote 60 where PIXEL was


//DS1307 RTC;// D103248237124 Establish clock object

RTC_Millis RTC;

DateTime Clock; // Holds current clock time

byte hourval, minuteval, secondval;


void setup() {
   strip.begin();
  strip.show(); // Initialize all pixels to 'off' //added this and above line
  Serial.begin(9600);
  Wire.begin();          // Begin I2C
  RTC.begin();   // begin clock


  if (! RTC.isrunning()) {
    //  Serial.println("RTC is NOT running!");
    // following line sets the RTC to the date & time this sketch was compiled

  }

    RTC.adjust(DateTime(__DATE__, __TIME__));
  strip.begin();
  strip.show(); // Initialize all pixels to 'off'
  strip.setBrightness(255); // max is 255

}


void loop() {


  Clock = RTC.now(); // get the RTC time

  secondval = Clock.second();  // get seconds
  minuteval = Clock.minute();  // get minutes
  hourval = Clock.hour();   // get hours


  if (hourval > 11) hourval -= 12; // This clock is 12 hour, if 13-23, convert to 0-11
  hourval = (hourval * 60 + minuteval) / 12;

  strip.setPixelColor(hourval, 0x008080, 51, 255, 255); strip.setPixelColor(hourval - 1, 0x004040, 51, 255, 255); strip.setPixelColor(hourval - 2, 0x004040, 51, 255, 255); strip.setPixelColor
  (hourval - 3, 0x004040, 50, 255, 255); strip.setPixelColor(hourval - 4, 0x004040, 51, 255, 255);
  // I added another strip of positioning code to the line above to add 2 more pixels either side making 5.
  //    strip.setPixelColor(hourval-2, 0x001010);strip.setPixelColor(hourval+2, 0x001010);
  strip.setPixelColor(minuteval, 0x800080, 255,0,0); strip.setPixelColor(minuteval - 1, 0x000000, 255,0,0); strip.setPixelColor(minuteval + 1, 0x000000, 255,0,0);
  //    strip.setPixelColor(minuteval-1, 0x200020);strip.setPixelColor(minuteval+1, 0x200020);
  strip.setPixelColor(secondval, 0x808000, 255, 255, 255);//strip.setPixelColor(secondval-1, 0x002F00);strip.setPixelColor(secondval+1, 0x002F00);
  strip.show();

  strip.setPixelColor(hourval, 0x000000); strip.setPixelColor(hourval - 1, 0x000000); strip.setPixelColor(hourval + 1, 0x000000);
  //added +2 -2 to this line also
  strip.setPixelColor(hourval - 2, 0x000000); strip.setPixelColor(hourval + 2, 0x000000);
  strip.setPixelColor(minuteval, 0x000000); strip.setPixelColor(minuteval - 1, 0x000000); strip.setPixelColor(minuteval + 1, 0x000000);
  strip.setPixelColor(secondval, 0x000000);//strip.setPixelColor(secondval-1, 0x000000);strip.setPixelColor(secondval+1, 0x000000);

  delay(25);


     Serial.print(hourval, DEC);
     Serial.print(':');
    Serial.print(minuteval, DEC);
     Serial.print(':');
     Serial.println(secondval, DEC);


}
https://www.rapidtables.com/web/color/RGB_Color.html
This RGB colour chart has been extremely useful.
